Saturday, September 29, 2012

Week 4

This week we spent a lot of time going over the assignments built with ofxKinect, ofxOpenNI, and ofxFaceShift from last week. There were a few short bypaths into discussions on:

We then discussed a host of examples that live in the Appropriating New Technologies repository related to 3d visualization. These examples demonstrate rendering point clouds, slices, voxels, meshes, with and without lighting, depth of field, and some other filmic techniques.

I also highly recommend checking out James George's RGBDToolkit for some nice realtime wireframe mesh with depth of field rendering.

James' code still needs to be broken out into a separate addon/example, right now it's deeply embedded within the RGBDToolkit application.

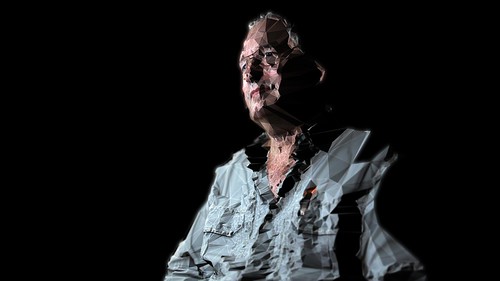
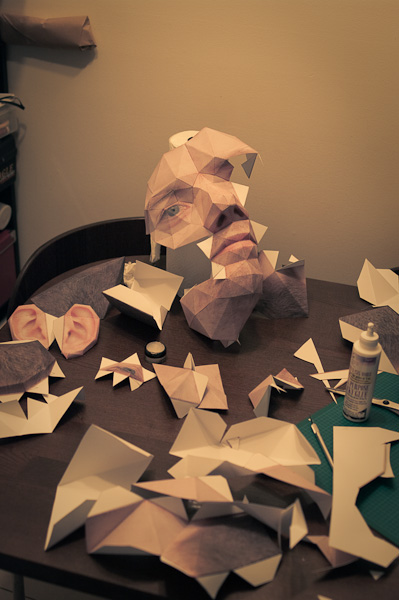
This week's assignment is: fabricate a physical 3d model. This means you have to take what was once "measurements" or "coordinates", and construct a physical object based on those values. This might mean folding some paper using papercraft techniques.

Or stringing lots of beads on wires:

Or printing slices of point clouds onto transparent sheets of material:

Or using slices of laser-cut cardboard:

Or even, yes, using a 3d printer such as a MakerBot with a Kinect, or the ZCorp printer at the AMS.

The goal is to become familiar with at least one technique for getting 3d data from the computer screen to the real world. You're encouraged, first, to build your own tools and be creative with the technique that you choose to manifest the 3d data. However, if you're not building your own tools for this assignment, then it should be clear from the quality, aesthetic, and concept behind the final object.

Monday, September 24, 2012

Week 3

First we followed up on the homework, and talked about some of the pitfalls of basic tracking and how to reconcile them (averaging regions of depth data, using temporal smoothing).

Then we discussed gestures, which is a general way of describing higher level analysis of depth data. We focused on:

We spent the last half hour looking at some work from Toshi, who is a something-in-residence at ITP and former ITP student sitting in on the class. Then we discussed ofxCv which we'll definitely get into more in the future.

The assignment this week is to pick an interesting gesture, track it using a Kinect (with any available library/toolkit: ofxKinect, ofxOpenNI, ofxFaceShift) and cause the gesture to influence something, or have some output, that is not on a screen.

Sunday, September 16, 2012

Cheating with the 3D Scanning

Three dimensional scanning is a bit of a challenge for anyone really but there are more and more tools to help you figure out how to image a physical object in terms a computer can understand and work with.

Of course the traditional techniques include understanding depth and location by directly measuring it like LIDAR and UltraSonic sensor, but those all require a great deal of specialized equipment. But then you have techniques that can extrapolate some knowledge from a 2D image and one of the newest techniques is the 123DCatch from Autodesk.


I used the 123DCatch App on the iPad to try to capture my sculpture for Idea's Taking Shape, a particularly difficult object to capture. The way 123DCatch works is by taking a great number of 2D images of the object from a variety of angles and then feeding the images into a cloud-based processor to stitch the images based in part on the content of the images and based also in part on the gyroscopic sensor data from the iPad, and then extrapolating the object's 3D figure.

The ultimate result was a disappointment, which I believe was due to the shapes complexity as well as the poor quality of the images. Take a look below at the image 123DCatch suggested!

Friday, September 14, 2012

Week 2

Today we got started with openFrameworks and ofxKinect. All the code is available on GitHub on the 3dsav repository. We covered:

  • Interfacing with ofxKinect
  • Exporting depth and color data from the Kinect
  • Rendering point clouds efficiently with openFrameworks
  • Building meshes from point clouds
  • Depth thresholding and background subtraction

This week's assignment is to build a forepoint detection and drawing system. That means detecting the point closest to the kinect, and using it to control a line drawing.

If that seems too easy, you should (in increasing order of complexity):

  1. Render the drawing in 3d instead of 2d.
  2. Track an arbitrary number of forepoint-like features.
  3. Implement an algorithm similar to optical flow with tracking, but in 3d.

Pin Screen Point Cloud


Pin Screen Point Cloud - Sheiva Rezvani & Claire Mitchell
Our approach was to recreate the structure of a pin screen, coat the screen in "ink" and create an impression into layers of mesh. We hypothesized that we would get a 3dimensional impression that resembled a digital point cloud. We could then take images of each individual screen, and digitally reconstruct the object from the layers.

We began by experimenting with materials, different sizes of mesh, various levels of elasticity, different sized pins, nails in order to get the right combination of 1) long enough to create a significant depth 2) sizes that would be complimentary so that the pins could easily go through the layers of mesh 3) structural frame for both pins and mesh.


Nail Screen Construction


Nail Screen Construction


We first tried to scan a mannequin's eye


Mannequin Eye Scanned


But the nails wouldn't go through the mesh.


So we used a banana and smaller pins


Banana Scan


We took an image of each layer of the glowing print to rebuild the 3d point cloud digitally- capturing the glowing ink became a challenge but the next step would be to rebuild the layers digitally.


OCD Cook's Chicken Drumstick Scanner

By Hye Young Yoon and Jee Won Kim

 
OCD Cook 3d Scanner Project from Jee Won Kim on Vimeo.

OCD cook has a mission with his or her chicken drumstick.


1.Install distance Measuring laser pointer inside the rotating wooden plate, inside the top hole
2. Rotate the laser around the drumstick and lower the laser as you rotate.
3. Jot down your 3d measurement from drumstick.
4. Calculate how much time is needed in order to cook the perfect drumstick!!!!

Thursday, September 13, 2012

Back to the basics


By: Mark Kleeb & Luisa Covaria

We built the scanner with 15 photo-resistors lined up on a square of plywood. 


The photo-resistors are connected to an ArduinoMega. 


The scanning stage is carefully light in order to calibrate  the photo-resistors.


We scanned a stapler, by slowly moving the scanner at 2 mm increases and by placing it 5mm from the object of interest.

We collected the data


Using processing the data was plotted


pickle scanner

yin+rose


The first assignment for the class 3d sensing & visualization taught by Kyle McDonald is to make a 3d scanner.

Rose and I made a pickle scanner.

how it works:
a pickle is submerged fully in water in a box
 the water is dyed with black ink

 a cover made of cardboard has a 12 x 9 grid drawn on it. A hole is poked through each square on the grid

 long sticks are inserted vertically down each hole on the grid, wherever it hits the pickle underneath, it doesn’t reach the bottom and hence sticks out more than the other sticks, thus creating a shape of the pickle above the grid cover


after a while, sticks are taken out, and readings are made on how much of the stick is colored with ink

these are the depth readings of the pickle

 combined with the grid coordinates (x and y) we have 3 D point cloud data

 raw measurements

visualizations in processing


 point cloud


 lines


it’s a pickle 

 other interesting shapes formed by imperfect data: