Sunday, April 3, 2011

Ideal Bodies /Final Project

First step in hopefully serie of works, focusing on the damaged bodies, and reconstructions of the same.
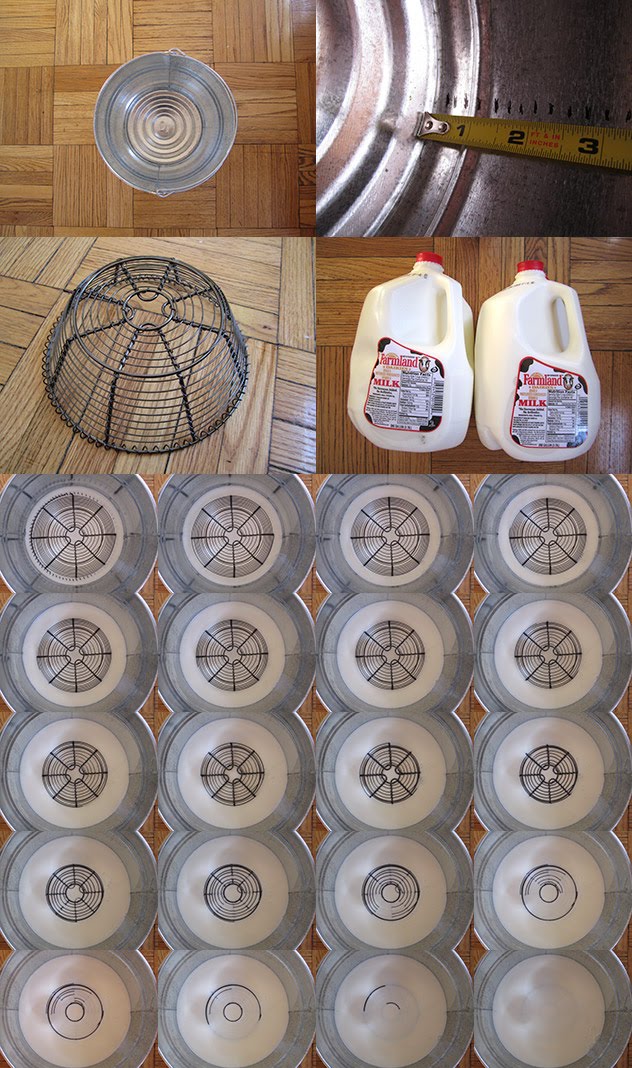
3D scans done with Kinect, mashes reconstructed in MeshLab.


Flapping Toasters

http://frontiernerds.com/flapping-toasters


Flapping Toasters misappropriates the popular early-90s screensaver published by After Dark to allow the user to fulfill their wildest fantasy and become the flying toaster.

While the toast and toasters still fly in a mainly isometric path, the user may control the trajectory of a toaster by flapping their arms for vertical motion or extending and rotating their arms in a rolling motion to the right or left. Finally, the user may add more toast to the screen by performing an exaggerated clap. Set to a midi version of Wagner's "Ride of the Valkeries."

Code is here:
Version 2 https://github.com/kitschpatrol/FlappingToasters
Version 1 https://github.com/voxels/flyingKinectToasters

Thursday, March 31, 2011

Landman performance visualizer


For my final project, I created a performance visualization tool for 8-bit artist Nullsleep. The idea for the piece was to use Kinect depth information to create a changing landscape and then to have a 3D model of Nullsleep himself bounced around as the landscape shifts. To achieve this effect, I used the Bullet Physics c++ library, which is frequently used in games and procedural computer animation to create physical environments that move realistically. I navigated the incredibly complex Bullet Physics API to create a ground plane whose geometry would be determined dynamically based on the incoming depth information from the Kinect.

This project will continue to evolve as I work with Nullsleep to improve the aesthetics towards a premier at Blipfest this summer.

Landman code on Github

Differential Invariants on the depth Image (documentation in-process/unfinished)

One of the most appealing things to me about the kinect is that we can use the full arsenal of differential geometry to analyze and extract features from the detected surface.

For example, the gradient gives us the normal of the surface at point (x,y,z).

An example of finding the surface normals on the image of Lena , can be seen below. Something that needs to be noted is that the intensity values of this 2d image are treated as elevation values.
Code at: github

Final Project

For the final project we worked with Eszter.
Our code can be downloaded from github here.

We thought it might look nice to create some branching object that traces / follows the human body and has an anthropomorphic look.

We worked a lot on it, but the outcome was not the desired at all. Although the graphics on their own look nice / interesting, the outcome is not the one we would have liked when applied to data from the kinect.

We used the limb "begin / end" locations from the skeleton to create a set of 3D paths that our branching algorithm should follow. For the path following, we used Daniel Shiffman's path following Processing example that we ported to openFrameworks in 3D instead of 2D.
Some of the results follow:


On its own, our algorithm produces a visually rich outcome and this can be seen on the following image

Preliminary Music Visualizer

For my final project in 3dSav, I wanted to make a music visualizer from the kinect point cloud data.  To analyze the music being played, I used the oF FFT visualizer example. I then mapped FFT output data to the kinect 3d depth image, adding or subtracting to the depth based on the FFT data from the music playing.  To make the visualizer a little more interesting, I added a feature that multiplies the dancer's body in the XY and Z directions.


Next Steps:

1) Add Color
2) Work more on camera positioning and rotation
3) Automatic triggering of visual effects and rotation
4) Gesture control to trigger specific transformation sequences
5) Improve the pause/delay function for multiple point clouds
6) Experiment with different ways to map the FFT data to the point cloud.

Source Code:
http://itp.nyu.edu/~mk3321/3dsav/visualizer.zip

Building a sculpture with Kinect IR structured light


Sculpture Work by Molmol
with openFrameworks + meshlab + solidworks


Objectifying Breath

For our final project, Ivana and I wanted to focus on the idea of transferring breath to objects. With the kinect, openNI, a weighted piezo sensor and the arduino, the user breaths a pattern of breath, captured by the piezo and the rhythm and speed is captured on screen. 'Breath' is depicted as spherical objects located throughout the digital environment. Upon breathing into the piezo, an object of breath 'attaches' to the user, and the user is able to interact and breath with other objects of breath around them. As the user approaches the object, the pattern of breath is transferred to the object, as they back away, the pattern diminishes.

Below is a video capturing the experience:


Untitled from Diana Huang on Vimeo.

Final project and all documentation

Greetings class, I just finished posting all the code and videos for all assignments, including the final with Matt, on my blog. Here's the link: http://nismazaman.com/itp/?cat=16.

Wednesday, March 30, 2011

Molly Recap

My first step into 3dsav was the destructive marzipan scan with Shahar.  I did some simple projects, starting from the depth visualizer code: creating a cube that changed colors,


then adding dot particles  from a center point, when a person moved passed a z space threshold.


In the course of things I broke a lot of projects, especially moving back and forth between 062 and 007, but that's been really useful for getting sea legs in OF.  But I spent most of the semester working on tests for a larger project called The Hidden Kingdom.  My final for 3dsav includes getting spheres set up in a 3d space aligned with the Kinect space, defining boxes of space to determine interactions with people, starting treatment of the lighting, and reaction of the spheres.  When a person comes in contact with a cube of space, all of the spheres in that space turn red and start to wobble upward... Code is here!

In action


Testing with Interaction Cubes Outlined


hiddenkingdomtestt from Molly Schwartz on Vimeo.

Holographic Warpaint


Last spring I worked on a play. It was an adaptation of Samuel Delany's epic science fiction novel, Dhalgren. This book is crazy, and the play was crazy - I did the sound design and worked on the video as well. This is the kind of book that sticks with you (the wild dense prose, the imagery, the....extremely detailed pornographic sex), and there were many things from the book that weren't realized in the play and I'm holding onto them. The book is set here - well, in a city somewhere in America - after an unnamed disaster has taken place. The city is a wasteland, but people are still living there. They live for free in parks, or squat in apartments where nothing works.

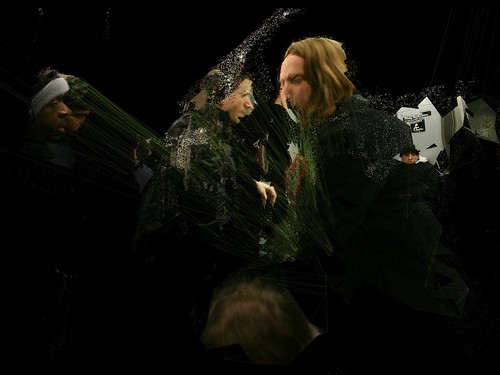
Gangs, known as the Scorpions, run the streets. This is the element I'm thinking about. Members of the Scorpions wear projector necklaces. When they press a button on the projector a holographic animal surrounds their bodies. Like holographic warpaint. One of the characters is known as Dragon Lady, because her projection is a dragon. One of them is a baby dinosaur - which I love. One of them doesn't work correctly and appears as an amorphous blob. I think it's weird that I can't find an image of this somewhere. I feel like it's one of the most memorable images from the book - gangs of fierce, oversized, holographic animals walking through the streets.

So, I made a failed attempt at this last semester in ICM using color tracking with lame colored LEDs strapped to my body. When the Kinect came out, I knew it was a solution, which is why I'm in this class.

I had previously envisioned a solid, neon colored animal shape for these shields, and thought of using skeleton tracking with OpenNI to animate a 3D character. I was nervous about the animated character, though, and pretty sure it would look dumb.

A simple, and I think effective, solution occurred to me late in the game. I reimagined the design of the holograms - they could be skinned as the creatures rather than shaped like them. I modified an example from class to remove background information, then map pixels from existing images to the depth image from the Kinect. I projected this onto two layers of mesh that I stood behind, producing a faux 3D projection effect. I tried a couple images - two dinosaurs and a lizard.

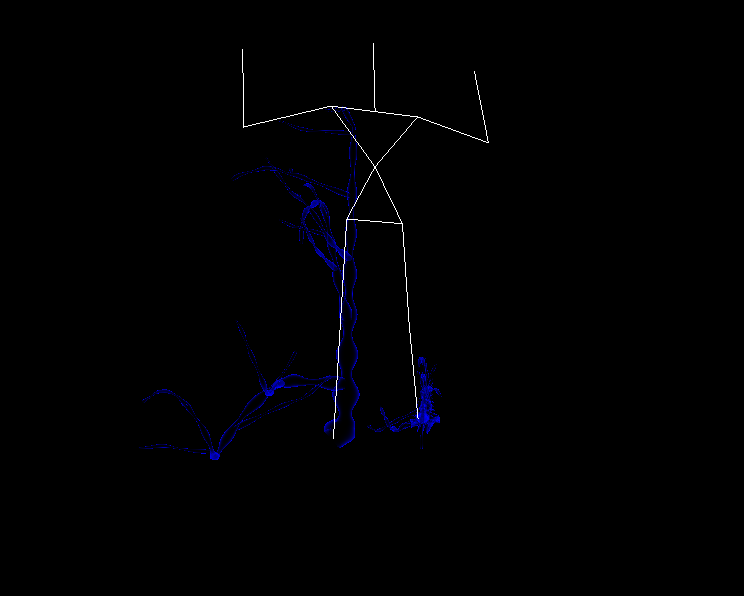
Here's a diagram of my setup:

This is a study for an effect to be used in a live performance.


Find the code here

source

Zach Recap

Above, our 3d visualization of the federal budget, more info here.

Above, a triangle rendering, experimenting with the kinect and opengl, I used triangles of random sizes instead of quads to draw a mesh.
Above, pong head, a game of pong that uses the kinect to control the paddles, and the loser's face becomes the ball. And more 3DSAV projects of mine here.


How to Disappear Completely + Dissolution


Fred Truman: Recap


Milk Scanner


Hit Test


OpenGL Lines


Triangle Fan Glitch Art


Budget Climb

Frankie: Recap


I came into the class with no prior knowledge of 2d computer vision or 3d graphics, so it's been a great learning experience. The class was a fast paced overview of 2d computer vision techniques as well as an exploration of 3d sensing and visualization. It was exciting and I feel motivated to delve deeper into many of the topics we covered when I have more time in the future.


During the first week, I worked with Kevin and Nisma on hacking a camera into an IR scanner.

The bounding box (cube) and centroid assignment was a good intro into translating 2d computer vision exercises into a 3d context.


Creating an object in 3d space and making it into a "switch" of sorts gave me a taste of what types of interactions were possible in 3d space.


I was also exposed to OpenGL and shaders for the first time, and had some fun experimenting with the various types of meshes. My favorite was the triangle fan mesh.


For the final project, I worked with Zach and Fred to create Budget Climb, project that brought together our interests in data visualization and interactions in 3d space:

Created using openframeworks, the Microsoft Kinect and OpenNI Budget Climb is a physically interactive data environment where we can explore 26 years of federal spending - giving us a unique perspective on how our government spends our money. In order to explore the data we must exert physical effort, revealing how the budget is distributed in a novel and tangible way.

budgetclimb.com

budgetclimb github repo


Tuesday, March 29, 2011

Kinect Abnormal Motion Assessment System

This february, at the Health 2.0 hackathon in Boston, I worked with a team of volunteers including a psychiatric resident and a number of masters of public health to build a prototype of a system to track hyperkinetic motion disorders. These are a class of neuromuscular disorders, frequently caused as a side effect of psychiatric drugs, where patients' bodies move involuntarily. They include tremors as well as more violent actions. They can range from uncomfortable to debilitating.

Here's a video of a patient with sydeham corea, an example of one of these debilitating disorders:


We used the skeleton data from the Kinect, accessed via OSCeleton, in order to automate an existing test associated with these disorders, the Ames Involuntary Motion Scale. In this test, patients are instructed to sit still in a fixed position with their hands between their knees and then the doctors evaluates the amount the move on a subjective scale. Our application measured the position of the hands and knees in three dimensions and then added up the amount of motion those points underwent over a ten second testing period. Here's an example of what the application looks like:


Our team won the hackday and were invited to travel to San Diego to compete in the national Health 2.0 hackday. We presented out application again there and won that competition as well.

We are currently working on plans for a scientific study to validate this measurement approach as well as exploring commercial options for developing the application. More information about our application and motion disorders in general is available here: motionassessment.com

Monday, March 28, 2011

Homunculus


Homunculus is a video self-portrait that explores facial expressions and physical performance. In it, I use the position of my body to puppet a 3D model of my own head. Each limb is mapped to a particular part of the face that plays a role in determining the emotional expressiveness of a facial expression: my hands control my brows, my knees control the corners of my mouth, etc.

The result is that small facial movements that distinguish different emotional expressions — a raised eyebrow, a curled lip, a brow furrow — get amplified into the large scale movements of my whole body. To achieve particular expressions such as surprise, contentment, anguish, I'm forced to contort my body into absurd positions that bear little expressive relationship to the emotion being expressed by the puppet.

The process of designing the interface, of configuring the precise mapping between skeleton joints and areas of the 3D model, also required intensive attention on which parts of my face move when making each facial expression. And likewise the process of hand-building the 3D model of my face required diligent attention to the construction of my face.

Technically, the application access the skeleton data via OSCeleton and it loads up the 3D model (created in Cinema 4D) as an obj file. The code is available on GitHub: Head-Puppet. Here is a good tutorial for getting up and running with OSCeleton on OS X.

http://www.vimeo.com/21576570


This is a first person view of the point cloud. View is controlled through OpenNI

Everything looks quicker because of framerate glitches (video was captured from oF directly with ofxQtSaver)

Code will go to GitHub later.

Saturday, March 26, 2011

Time Travellers


Time Travellers is a real-time video mirror currently installed at NYU’s Interactive Telecommunications Program. The Microsoft Kinect is used to take a “depth image” of the viewer and map it to time on a source video. The closer the viewer is to the camera, the later in time is the video.


Created in openFrameworks. Source code available here.

Kinect VJ and Visualization Tool - FINAL

Hey All!

Here is a link to my github repo where I have my code as it was during my presentation of the final. I a doing some serious updating of the code today (comments, getting rid of extraneous code, etc). so if you download the stuff today, make sure you come back soon to get the updated code, which will be a billion times better.

Also, stay tuned for full scale documentation of the project. I highly recommend Syphon for screen capture (follow Toby's email about setting it up). I used it yesterday and it worked great.

gity up: https://github.com/dmak78/kinectVJ

some videos: http://vimeo.com/user4751444

So again, this is not my final documentation, but I wanted to make sure the code was up on github and that anyone that wants to peep it out can.

Kevin

Thursday, March 24, 2011

Final summary - Yang Liu

In this class, I mainly focused on the basic technique on the assignment. And for the final, I integrated these techniques with one of my video games made in Processing.

This is the LINK to my post.

How to Disappear Completely (teaser)

Tuesday, March 22, 2011

Aligning ofxOpenNI Skeleton and Point Cloud

Currently, the ofxOpenNI addon puts the skeleton in projective space instead of leaving it in real space. To change this, remove the following line from ofxTrackedUser.cpp inside ofxTrackedUser::updateLimb():


depth_generator->getXnDepthGenerator().
ConvertRealWorldToProjective(2, pos, pos);


If you are computing the point cloud with a flipped y axis, you also need to flip the skeleton at this point:


pos[0].Y *= -1;
pos[1].Y *= -1;


From here, the data is ready to be used. If you want to see it, you need to change one more thing. Inside ofxTrackedUser.h, in ofxLimb::debugDraw():


glVertex2f(begin.x, begin.y);
glVertex2f(end.x, end.y);


Needs to be changed to:


glVertex3f(begin.x, begin.y, begin.z);
glVertex3f(end.x, end.y, end.z);

Monday, March 14, 2011

Reconstructing a Mesh from a Point Cloud

I posted a video describing one way to reconstruct a mesh from a point cloud in Meshlab, based on some info at the Meshlab blog.


Poisson Reconstruction in Meshlab from Kyle McDonald on Vimeo.


And I got a bunch of great tips from Sophie Barret-Kahn: here's an academic paper reporting on the different software that's available.


Rhino has a lot of tools for meshing, re-meshing, and surfacing (making parametrized functions that describe the mesh). Here's one for working with a point cloud:


There's more info on the Rhino tools here.


If you're more of a nerd, Matlab has some good low-level tools for handling this kind of data.


Finally, Blender has its own tools for dealing with mesh reconstruction. Taylor Goodman, who developed a structured light scanner for Makerbot, has a tutorial describing how to reconstruct a mesh for 3d printing from a point cloud:


I think there is a script for this on blenderartists but the site is broken at the moment.

Friday, March 11, 2011

Noise in the Kinect Depth Image

I've been looking into the noise that you get in the depth images that come from Kinect. I've found two good references so far: Kinect Z Buffer Noise and Audio Beam Steering Precision and Experiment to remove noise in Kinect depth maps. The general consensus seems to be that the error in the Kinect images cannot simply be averaged out over time, and that it has to do with some kind of quantization noise in the stereo matching algorithm. Also, most of the noise is in the center of the depth range at a few meters away. There might be some way to remove the quantization noise if it's constant with respect to the 2d image -- if it's constant with respect to the 3d space, it would be way too intensive to sample.

Thursday, March 10, 2011

Kinect + CUDA

These are the first captures of a prototype combination of NVidia's CUDA SDK smokeParticles example with the OpenNI NiViewer. The sphere of particles follows the right hand. The first and longest video is the movement captured while listening to Way Out West's One Bright Night (Instrumental), which is played as the soundtrack.

KinectCudaTest from Voxels on Vimeo.


Progression from Hello World

Sunday, March 6, 2011

3D Fractals from GLSL

3D fractals written in GLSL running through WebGL on Chrome.
http://www.subblue.com/blog/2011/3/5/fractal_lab


Thursday, March 3, 2011

3D SelfPortrait by Eric Testroete

Zach mentioned this in the class...I don't know if he showed this particular example.....

so obvious....yet...disturbing......and beautiful...


whole process

A Good Source for OpenGL Examples...

ENSIMAG

Flocking as a series of matrix operations

This week, I’ve been getting a grasp on the Eigen BLAS library for C++ in order to convert Robert Hodgin’s Cinder flocking tutorial into a linear algebra operation. This is intended to be an intermediary step as I move towards flocking as a GPGPU calculation. My guess is that if I can nail down the order of operations as matrices, it will lend itself to multithreaded and highly parallel processing.

So far, I have rewritten the separation algorithm as well as the gravitational pull towards the origin. There’s an unexpected interaction between boids at close range which I cannot explain, even after comparing the matrix operations and the traditional code in calculations by hand, but they do seem to right themselves after a bit of a tango.

In addition to rewriting the flocking algorithm, I have attempted to fold in the OpenNI skeleton interaction and an OpenGL shader pipeline with limited success. The OpenGL shaders compile, but I haven’t gotten to getting anything interesting to work (not even basic lighting), mostly because I’ve spent several days squashing mathematical bugs in the flocking code. I did manage to hack in the OpenNI skeleton and use it as a repelling force to particles that are influenced by the separation code. This will probably look a lot more interesting when the rest of the flocking code is implemented, and I have some point lights attached to the skeleton joints.

To conjoin the behavior of the boids with the skeleton, I expanded the size of the position matrix to include 15 additional columns, which hold the positions of the joints. Before user tracking begins, these points are randomly distributed, but once the user is obtained, the positions are overridden and are controllable. There are all kinds of problems with the render: scaling being the most obvious, but also some tearing in the frames. I’m also concerned that by scaling down to a world of about 10 units, I’m running into floating point nonsense. I’m trying to negotiate another problem that I’m having understanding the aperture and focal length of my stereoization example code.

I’ll continue to work on it this weekend by first finishing the flocking code and then trying to render with some materials and lighting. Here are some notes on the matrices:

http://yfrog.com/h251863569j


Wednesday, March 2, 2011

VJing with the Kinect

This last Friday, I was invited to tag along with Ryan Uzilevsky, who I intern for at his company Light Harvest, to a VJ gig he had at a big ole' techno party near Columbus Circle. It featured DJs Wolf+Lamb. They rocked the house.

I was invited to hook up the Kinect, point it at the DJ, and control the visuals with a MIDI controller, using OSC, into openframeworks.

VJing in 3D with Kinect from Kevin Bleich on Vimeo.

Time Travellers


The Kinect depth image is mapped to time in a time-lapse video of NYC. The closer you are to the camera, the later in time is the video.

Original video by Erik Paulsen.

Monday, February 28, 2011

Buncha Kinect projects from CMU

Interactive Art & Computational Design class at CMU has a bunch of interesting kinect projects including some projection mapping stuff, some skeleton-tracking puppeting, etc. I especially like the Magrathea dynamic landscape creation one:

Magrathea - Dynamic Landscape Generation with Kinect from Timothy Sherman on Vimeo.

Saturday, February 26, 2011

Avatar Kinect 3D scan and photo map

Microsoft demos a process in future Kinect games of taking a 3D mesh from the kinect and mapping a flat photo over it to create a talking photorealistic avatar:


I'd love to get my hands on that software that's translating the text into facial muscle movements...

Microsoft Research

http://www.youtube.com/watch?v=uLcE0qlWMkQ&feature=player_embedded#at=64

Thursday, February 24, 2011

Sound Spaces

Sound Spaces by Ivana & Diana

This week, the biggest hurdle we had to work through was deciding what kind of interaction we wanted to bring to the space. First, we played with the idea of changing surroundings through adjusting the bounding box (and then later, other shapes) with our interaction. After working through this we decided it wasn't quite right and we wanted to change the space as we were physically moving through this. We liked the idea of moving shapes and their surroundings and played a bit with spherical surfaces that were able to move with parts of the body but again, not exactly what we wanted to do. Finally, we agreed upon creating an interaction in the 3D space to control sounds. Using .wav files of various frequencies, we created boxes that turn the sounds on and off. When physical presence is detected in the space of the boxes, the boxes turn from transparent to opaque and a sound is created. There is a bit of sound interference from the very beginning, giving it kind of a dead radio space feel to it. We were delighted by this cool, unexpected effect -- You can hear and see below:

VIMEO VIDEO.


Video Mirror with Space Portal Ripple

First draft of the concept as seen in every other sci-fi movie. Calibration needs work.

Using the Kinect to Track Involuntary Movement for Psychiatric Testing

This past weekend I participated in the Health 2.0 Boston hack-a-thon. I worked with a group that included statisticians and a psychiatrist. We used skeleton tracking with the Kinect to automate a test for involuntary motion that psychiatrists use to track the condition of patients with neuromuscular disorders (frequently caused as a side effect of psychiatric drugs).

The app tracks the linear motion in 3-dimensions of the hands and knees of a patient who's instructed to sit completely still. The total amount of motion is compared against a pre-set quantity to determine red, yellow, or green score. The scale was calibrated in advance by the psychiatrist demonstrating normal and abnormal amounts of motion.


Obviously this is a one-day prototype, but the psychiatrist was excited enough about it that he wants to get it approved for use in his clinic after a few iterations.

My team ended up winning the event and will be continuing to develop the app and presenting it in San Diego at the national Health 2.0 conference where there's some kind of big prize if we win.

Here's my full blog post about the event.

General Tau theory


For homework this week, I attempted to build an algorithm which implements Dr. David Lee's General Tau theory, as described in a recent paper, "How Movement is Guided".

A few relevant paraphrased quotes:
Principles of Animal Movement:
1) Movement requires prospective control.
2) The perceptual information guiding movement must extrapolate the movement into the future and must be readily available.
3) Movement requires constant intrinsic-cum-perceptual guidance. Intrinsic guidance is necessary because animals have to fashion movements to their purpose.
4) Movement guidance must be simple and reliable.
5) There are simple universal principles of movement guidance in animals.

Rather than use multiple information about the size, velocity, and deceleration of the motion-gap, we simply use the tau of the motion-gap. Tau is a measure of how a motion-gap is changing. It is the time-to-closure of the motion-gap at the current rate of closure, or equivalently, the first-order time to closure of the motion-gap.

Tau was first formulated in an optic variable that specifies time-to-collision if the closing velocity is maintained. Note that tau is not in general the actual time-to-closure of a motion-gap, because the velocity of a closure of a motion-gap may not be constant. The Tau of a motion gap is numerically equal to the ratio of the current size, x, of the motion-gap to its current rate of closure, i.e. T(x) = x / x'.


If the tau of two motion gaps remain in constant ratio to each other, they are said to be tau-coupled, and this is basically how we use perception in action to move about a space. For example, a bat landing on a perch needs to control simultaneously the closure of two extrinsic motion-gaps: the distance motion-gap, X, between itself and the perch and the angular motion-gap, A, between the direction line to the perch and the direction that the line should assume during the final approach to the perch. Bats tau-couple A and X (T(A) = kT(X) for a constant K throughout the maneuver.

Raising food to the mouth is tau-coupled, as is the motion-gap between the hand and the bat with the motion-gap between the ball and the bat in baseball.

Motion-gaps are not necessarily movement of objects. They can also be the change in other dimensions. Tau coupling may work in the following power law relationships:
Guide by sound including dolphins and bats.
Guide by smell including microbes.
Guide by infra-red radiation in rattlesnakes.
Guide by electrical fields in fish, sharks, platipi, and bacteria.

Tau-coupling has been studied in trombone playing, where the movements of the trombone slide, the lips, and the resulting acoustic pitch-slide are tau-coupled with a similar K value. It has also been tested in the neurological activity of monkeys:

"The hypothesis was tested by analyzing the neural power data collected from monkey motor cortex and parietal cortex area 5 during a reaching experiment. In each cortex a neural power motion-gap was found whose "tau melody" ( the temporal pattern of tau ) was proportional to the tauG melody and to the tau melody of the motion gap between the monkey's hand and the target as it reached. In the motor cortex, the neural tau melody preceded the hand movement tau melody by about 40 ms, indicating that it was prescribing the movement. In the parietal cortex area 5, the neural tau melody followed the movement tau melody by about 95ms, indicating that it was monitoring the movement."

In short, there's a lot of evidence which suggests that tau is a measure by which we understand intrinsic and extrinsic motion, and the constant between tau-coupled motion should be useful for creating gestures between joints.

I've started to code a framework in which I calculate the relative position of the joints from the torso in spherical coordinates and use those to obtain a tau for the radius, theta, and phi between all of the joints in relation to each other. Using the OpenNI skeleton, there are something like 1,307,674,368,000 (15!) possible generic combinations of movements to be made if you were ONLY using distance and not the angles, give or take ( somewhat less because you can't have a gesture with a limb in reference to itself, I think, but also quite more because that's not saying what *direction* they're moving in, or even thinking about tau-coupling distance with one or both of the angles, which basically puts you into an infinite number ). Most of those gestures are nonsense.

Anyway, if the ratio between two limbs' closure of a motion-gap remains at a constant ratio K, and that K is above a certain threshold, AND (I've decided) both of the limbs are moving, then that is a valid gesture, and it can be cataloged. Figuring out the thresholds is a bit tricky, bit it's also more tricky to figure out what the closure of the motion-gap is when you don't know the end point. I tried to write some code that used the distance and angles between the joints and the torso to define the motion gap, but found that small movements create huge taus (given that I'm calculating the first order derivative as the difference between last frame's position and this one - which might very well be wrong ).

I think I'm going to go back and rework the solution to be defined by the *opening* of a motion gap, since I have historical data. In this way, as long as a K between joints is constant, the gesture is still in motion. When the K changes and stabilizes, a new gesture is being signified. Unfortunately, I've only worked on this problem today, so I'm not quite sure what the results of that will be.

Wednesday, February 23, 2011

Homework

When distance between blue box's and sphere's centroids becomes critical, stuff happens.

Sphere's position is based on distance to Kinect (closest).

I guess I somewhat cheated.

Kinekt Kultism

Sunday, February 20, 2011

Taking Control Over My Translations: Basic 3D Data Tracking

[2/21 UPDATED: ADDED ANOTHER VIDEO BELOW

(Moderate) Success! This is a video of the first time I was able to get the kinect data to track my hand in all three axes. Next phase will be to employ some gesture tracking and recognition, and possibly, optical flow. Stay tuned.


Taking Control Over My Translations: Basic 3D Tracking Demo from Kevin Bleich on Vimeo.


UPDATE:
Another quick test of 3D tracking in a specified region of imaginary 3D space. Nothing too special happening here other than that. Next step is to get some velocity sensing on these regions to trigger something like drum samples. Invisible Drum Kit Here I Come!!

Punching Box: Not So Basic 3D Tracking from Kevin Bleich on Vimeo.

Thursday, February 17, 2011

Finding the OpenCV contour of a virtual camera projection of a point cloud

As we talked about in class today, here's some video of converting the 2D projection of the point cloud created by the camera into an image and then handing it off to OpenCV to do contour finding and bounding box stuff with. Top left is raw depth, bottom left is 3d point cloud with bounding box and orientation line, top right is contour and bounding box of 2D projection.

Destructive Scanning

DIY 3d scan (destructive)

Following a short brainstorming session, our group (Shahar & Molly) converged on the idea of destructive scanning (what does that say about us?). We liked the idea of consuming the object as it's getting scanned and "rebuilt" in 3D in the computer.
We immediately thought the inkscanner was a good place to start, and after the "dissolve the object using acid" idea came off the table, we settled for taking the slices concept literally, and physically slicing the object that we would scan. Molly brought some fancy marzipans, I got a knife, and we got to work.
The process was pretty straightforward (or so we imagined it to be):
  1. Slice an object
  2. Take some photos
  3. Run the photos through the Fluid Scanner
The first problem we ran into was that it was hard to cut the marzipan into thin enough slices to get a good resolution on that axis. That might be remedied by simply choosing more easily slicable objects. The other problem was that the Fluid Scanner didn't really work, and the source code did not compile either (used an older OF version). We struggled with it for a while before deciding to try something else. Molly went for AfterEffects, while I tried to write some Processing code to replicate the desired effect.
Here's the code we ended up using.


carrot from Molly Schwartz on Vimeo.


carrotae from Molly Schwartz on Vimeo.

Addition to the snowman

Structured light experiments
by Diana Huang, Ivana Basic, Eszter Ozsvald, Nikolas Psaroudakis and Yang Liu

While we were playing with snow, we also dabbled with experimenting with the structured light example that Kyle provided for us. We thought this would be simple to try and implement however we experimented a few times before we found the first setup to create a structured light scan that we were satisfied with-- Following positioning instructions is key. After viewing this video here (http://vimeo.com/13100293) we thought we could try positioning the camera and projector together directly above the object we wanted to scan. These scans didn't come up with as much information as we wanted for our scans. We found that positioning the camera and the projector at angles - tangential to the surface of what we wanted to scan, created the best scans. (We should have known this in the first place, per the Instructables, however we wanted to test some other configurations out. ) Also, we found that instead of a white backdrop, a black backdrop with lighter clothing created the best scanning environments. Below is an interpretation using a few of our scans during our "experimentation" period. Some of the textures created are very visually interesting. Featuring Ivana Basic and unknown ITP mask. Music by Rastko.


3D, OpenCV, and Me - Homework#2

3D, openCV, and me - 3Dsav#2 from Kevin Bleich on Vimeo.


This assignment will go down in infamy. I am pleased with my results, but there is still so so so so much more to explore with all this data.

So far, I have been able to calculate and draw the bounding box, and centroids. I next experimented with some blob detection and contour finding. Once I was able to get something cogent together I thought an easy way to track small blobs in 3D would be to change the threshold amount on the contour search along with my movement BACK and FORTH in the z-axis. Here I am only calculating the brightest bits so, for example, if I were tracking fingers on both hands as soon as one hand is farther back than the other, the dual track is lost. Must work on this.

For some quick interaction I decided I would use the blobs to control the pan around the 3D point cloud, which is what you are seeing here. Apologies for the jumpy graphics, I think I was getting some noise in the Kinect because it was being a lot more smooth than that.

In my research of openCV and motion tracking, I realized I knew zilch about coding for gesture recognition. I think I am ready for that challenge. I think I'll be fine though since I really didn't know how to do what I did in the video a week ago.

At the top of my list for questions tomorrow is to ask about great resources for learning how to track and utilize gestures, as well as learn more about how I might be able to track multiple discrete objects in 3D.

I have a few ideas for visualization as well, but I am getting way ahead of myself. 3D baby steps.

Kevin

Wednesday, February 16, 2011

Homework #2 - High Five


My first experiments with the Kinect.

Calculated the bounding box and centroid. When you make a high five motion, it scrubs though a video of me giving you a high five.

Bounding Box homework

Mike Knuepfel and I worked on our homework together...I'll do a blog post soon explaining how we created the bounding boxes, the centroid and the center of the bounding box, but in the meantime, here's a video: http://vimeo.com/nisma/3dsav-hw2. I added opticalFlow files and made the rotations dependent on the movement of the subject.

Scan a fruit basket with milk?


Yes

1st Week Assignmnent "Snowman Scanning"

Skeleton Tracking with OSCeleton

Got up and running with OSCeleton and Processing. Using the joint location data to draw a stickman in 3-space and then using the relationship between the various joints to control the movement of a camera around the model: distance between hands controls zoom, the camera follows the right hand, putting both hands above the head rotates the camera, and putting both hands bellow the hips rotates the camera the opposite way:


Full write-up here: Skeleton Tracking with Kinect and Processing.

Sunday, February 13, 2011

3d scanning at union square station

we took the kinect to Union Square for candid shots mixing HD SLR and the depth image in a custom openframeworks application


Thursday, February 10, 2011

Week 2: Homework

This week's homework consists of four separate components.
  1. Find the bounding box center and centroid for 3d data. Visualize their relationship.
  2. Pick a computer vision technique, and extend it to 3d. For example, apply a blur or morphological filter to the 3d data and think about how it is affecting the data. For advanced students, consider writing an optical flow algorithm, extending contour detection/connected components to 3d, or using the depth image to inform a face tracking algorithm.
  3. Track a single gesture in 3d. This may use the results of steps 1 and 2. For example, using the result of step 1 to recognize a "superman" gesture.
  4. Post a summary of the information from last week's project on the class blog. You may host it elsewhere, but you need to at least provide a link and one picture here. The description should provide enough information that with some ingenuity could recreate it, but it doesn't have to be written as a tutorial.
A basic project for working with 3d data is available on the class github. For instructions on how to use the code, see the readme on that page.

Week 2: Computer Vision and 3d

Resources

Super long, in depth, free book on computer vision by a researcher at Microsoft that worked on Photosynth. Computer Vision: Algorithms and Applications

Learning OpenCV is one of the best resources for learning about computer vision in a practical, application-oriented way.

Another really good way to learn OpenCV is just reading through the tutorials and documentation on the OpenCV website.

The Pocket Handbook of Image Processing Algorithms in C is great for little tips and descriptions of computer vision and image processing algorithms, though it's a little buggy sometimes.

Computer Vision Test Videos
from Theo and other contributors. There are lots of other websites with test videos for computer vision, for a variety of applications/domains.

References

Kumi Yamashita is a NYC-based artist that has worked with 3d volumes projected as 2d shadows. Also see work from Larry Kagan.

2d shadows/forms can also be projected into 3d spaces. See work from Justin Manor and Tamas Waliczky.

Because 3d is still relatively new, it can be helpful to think about how the visual aesthetic is related to older forms. Consider the work of Sophie Kahn compared to Norman McLaren's Pas de Deux. Or compare the recent Moullinex video to sculpture by Antony Gormley.

Sound Scan: 3D scanner using falling BBs and sound

Rough, DIY 3D scan using a grid of holes, falling BBs, a photo interrupter, and a microphone (Greg, Eric, Jeff, Zeven, and Molmol):


Full write-up here: Sound Scan.

Cool 3d Sensing Link - Aligator Embryo


This is a cool video showing a developing aligator embryo.  The scanner can not only sense the outer skin of the aligator, but also internal structures like the skeleton.

Homework #1

Class Syllabus

Class Description

This course will explore recent developments in 3d scanning technology and the tools and techniques for collecting, analyzing, and visualizing 3d data. Once relegated to the realm of academic and military research, 3d scanning has recently been made available to amateurs through DIY implementations like DAVID laser scanner, or, in the case of Kinect, through open source reverse engineering of cheap consumer hardware. We will cover different methods of 3d input, including structured light, LIDAR, time of flight, stereo matching, and optical triangulation -- and focus on techniques for organizing and collecting data, creatively visualizing it, and using it in an interactive context. This course will be taught using openFrameworks, a C++ toolkit for creative coding. While the class will be highly technical and code-heavy, there will be a strong emphasis the poetic potential of this new form of input. This two-point course meets for the first seven weeks of the semester.

Schedule

Week 1 (February 3rd)
Introduction to 3d scanning technologies, including LIDAR, structured light and Kinect, stereo and multiview stereo, optical triangulation, and others. The assignment will focus on creating a 3d scan in a group.

Week 2 (February 10th)
Groups present their 3d scans from last week. Continue discussion on scanning techniques. Start working with scan data for interaction, start exploring 3d for interaction. The assignment will focus on 3d as an input for interaction.

Week 3 (February 17th)
Short presentations of work from previous week on interaction. Continued discussion of computer vision for interaction in 3d, handling and processing 3d information.

Week 4 (February 24th)
Start discussing methods of processing scan data for visualization/rendering, including voxels, point clouds, and depth maps. This will lead into a discussion of processing for fabrication on laser cutters, 3d printers, and other devices including non-computational systems. The assignment will focus on recreating specific looks, and producing your own look on a screen or as a fabricated model.

Week 5 (March 3rd)
Note: Kyle will be absent for this class.
Presentations of models from previous week. Discussion of projection mapping and augmented reality systems that take advantage of information from 3d scanning. The class will conclude with a discussion on potential final project ideas. Students are expected to begin working on their final project at this point.

Week 6 (March 10th)
Presentation of intermediate work on final project, followed by discussion and problem solving. This class will primarily be guided by the subjects and problems students encounter while working on their final projects.

Week 7 (March 17th)
Presentation and discussion of final projects.

Assignments and Grading

Assignments will be given at the end every class. Some assignments will require students to post to the class blog http://3dsav.blogspot.com/ which all students will be given an invitation to join. Besides the weekly assignments, there will also be a final project due at the end of the class.

In order to pass the class, students must complete the assignments, the final project, and attend class. A student will fail if they miss more than one class, miss more than one assignment, or fail to present a completed final project.

Resources

Notes from each class will be posted by the instructors to the blog. The syllabus can be found in its most up-to-date form on the class blog at this link.

Wednesday, February 9, 2011

Robert Lazzarini

In thinking about using/visualizing 3d information:

Robert Lazzarini warps familiar objects and then re-casts them in the original materials.  The skulls are cast in ground bone, so they are pale and matte.  Visually they are difficult to comprehend.  You want to physically hold them in your hands to understand them, because they look flat against the wall instead of actually three dimensional. 

http://www.robertlazzarini.com/

NASA's Twin Stereo Probes


"This is a big moment in solar physics," says Vourlidas. "STEREO has revealed the sun as it really is--a sphere of hot plasma and intricately woven magnetic fields."

Each STEREO probe photographs half of the star and beams the images to Earth. Researchers combine the two views to create a sphere. These aren't just regular pictures, however. STEREO's telescopes are tuned to four wavelengths of extreme ultraviolet radiation selected to trace key aspects of solar activity such as flares, tsunamis and magnetic filaments. Nothing escapes their attention.


- more via NASA