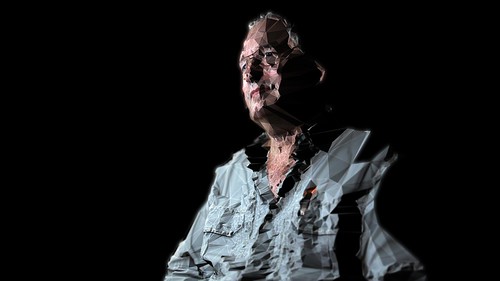
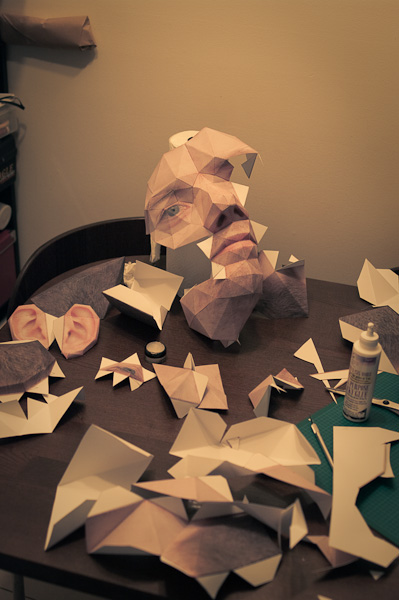
An experiment with ThreePhase Scanning.
Thursday, November 15, 2012
Projection Mapping Dice
Using my early forepoint tracking code, together with ofxSyphon and MadMapper.
MakerBot Counting Hands
The homework was to turn data collected on a computer into a 3D object.
Integers between 1 and 10 seemed to be the most simple data that I could turn into a three dimensional model and so I decided to use the number gestures using a single hand that I had noticed when in China. I used KinectToStl to get the hand models rendered as STL mesh files from Kinect depth data. After editing the STL files in Meshlab, I outputted the combined files to the MakerBot to print.


Integers between 1 and 10 seemed to be the most simple data that I could turn into a three dimensional model and so I decided to use the number gestures using a single hand that I had noticed when in China. I used KinectToStl to get the hand models rendered as STL mesh files from Kinect depth data. After editing the STL files in Meshlab, I outputted the combined files to the MakerBot to print.


Wednesday, November 14, 2012
SMS Frown Alert
Homework Assignment to build something that pulls facial gesture data out of faceshift in order to actuate something in the real world.
Enter the SMS Frown Alert....
Enter the SMS Frown Alert....
Saturday, November 10, 2012
Staring Contest
Staring Contest from Mark Kleback on Vimeo.
Using the Forepoint algorithm, an Arduino, and a stepper motor, this Kinect can't take its "eyes" off of you.Tuesday, November 6, 2012
Sliced head
For the final class I've decided to combine 3D printing and AR. A pattern is printed on each head's slice. Every pattern is associated with an image of human brain's slice that is projected on top. Slice by slice the user explore the human brain. According to the stimula sent to the brain different images will be projected in order to highlight the different affected area.
Sliced Head from Federico Zannier on Vimeo.
Projection mapping: e-books
I wanted to make my books more attractive and play around with projection mapping.
e-books from Federico Zannier on Vimeo.
3D scanner
For the first assignment we were asked to build a 3D scanner from scratch. I took inspiration from <a href="http://fredtruman.com/3d-sensing-and-visualization-week-01-milk-scanner" title="this" target="_blank">here</a> and I tried to build my own.
3D breakfast from Federico Zannier on Vimeo.
Drawing with a Kinect
Using OpenFramewoks, the challenge for this assignment was to find the 'fore point' from the Kinect's Depth Image and treating it as the tip of a pencil.
I've merged the ribbon example by James Jorge with the Kinect point cloud example by Kyle McDonald.
Hand drawing with a Kinect from Federico Zannier on Vimeo.
Saturday, November 3, 2012
Week 1. Apple.
For the first week's assignment ("make a 3d scanner"), Manuela and I decided to scan and render an apple, taking two approaches.
1) Milk Scan (non invasive)
We cut an apple in half, put it in a container, and covered it with milk in layers as tall as a sheet of acrylic that we planned to use to reconstruct it later. Of course this was a serious scientific experiment, and as you can see in the photos we marked registration points, measured the layers of milk, and made sure that the table was level.

The one problem that we had –the lighter lower half of the apple started to float–, we fixed by punching metal nails into it. So the scan became quite invasive after all...

Here is a sample of the photos we took:

Once we had the images, we processed them to get the outlines to send to the laser cutter, but since the machine was down, we continued with our second plan.

2) Knife Scan (invasive)
For our second scan we cut an apple in thin slices, lit from below so that the details of the texture were visible:

Then we created a gif animation of it:

, made a Processing sketch to reconstruct it:

, and finally recreated the effect using Kyle's Slices Example code, from the Appropriating New Technologies class):
Friday, October 19, 2012
Close Encounters of the Schlossberg Kind
TESTING TESTING
testing my alien communication device from r k schlossberg on Vimeo.
AND ACTIONCLOSE ENCOUNTERS OF THE SCHLOSSBERG KIND: V002 from r k schlossberg on Vimeo.
Thursday, October 18, 2012
Transparent screen


Friday, October 12, 2012
little interactive projection mapping exercise
this is just a little prototype..the idea is that once you stick your head into the box, you experience going down and forward as the rings move up...
video is a little confusing as my camera framerate too low..it captures the projector frequency...you are only supposed to see the thin pink stripes


projection mapping tests
first i did a madmapper test on a door
projection mapped door from r k schlossberg on Vimeo.
then i tried to do something which would emphasize the 3rd dimension.. projection-mapped paper crane"enough"; a study of a physical form and overwhelming media information
enough: a study of an iconic physical form and media information from Jee Won Kim on Vimeo.
"How is our experience of a spatial form is affected when the form is filled in with dynamic and rich multimedia information? (The examples of such environments are particular urban spaces such as shopping and entertainment areas of Tokyo, Hong Kong, and Seoul where the walls of the buildings are completely covered with electronic screens and signs; convention and trade shows halls; department stores, etc,; and at the same time, any human-constructed space where the subject can access various information wirelessly on her cell phone, PDA, or laptop.) Does the form become irrelevant, being reduced to functional and ultimately invisible support for information flows? Or do we end up with a new experience in which the spatial and information layers are equally important? In this case, do these layers add up to a single phenomenological gestalt or are they processed as separate layers?" from 'The Poetics of Augmented Space' by Lev Manovich.
[original video footage]
hwa2 from Jee Won Kim on Vimeo.
Thursday, October 11, 2012
The World's Tiniest Projection Map!
I decided to projection map onto my 3D object from last week, and this is what I got.
Perspective Transform for projection
In projection, the problem is similar, what we have on screen is different from the projected surface as long as the projector is not perpendicular to projected surface. So I tried to implement that algorithm in Processing to make projection easier without MadMapper or something like that.
The algorithm I used is exactingly the same to the one on http://xenia.media.mit.edu/~cwren/interpolator/. The transform method is not a simple multiply of a matrix. so I write my own line function to do transform before line is actually executed. Maybe it can be implemented in a deeper level to make it easier to use.
So. I have this on my screen. And it looks not so good on ducts.


But I can drag the corners to remap it.


Also on side of duct.


Tuesday, October 9, 2012
My Surrealist Object - in 3D!
Homework from week 5.
Github: https://github.com/kimash/3DSAVwork/tree/master/tube
Monday, October 8, 2012
Week 5
This week we started with a discussion of two 3d capture tools:
- 123d catch can reconstruct a mesh based on a collection of 20-40 photos of a scene. You can download the .obj file from their website after the data has been processed. 123d catch can be used at all scales, limited by your camera rather than the scene.
- reconstructme uses your kinect to create high-accuracy meshes (higher accuracy than any single kinect scan). reconstructme is best for human-scale objects and indoor scenes.
And we moved on to exploring projection mapping. There are two major paradigms:
- Illusion-based mapping: where you try to create the appearance of a false geometry to a scene, for example by providing a "window" into a space, extruding or indenting features from a surface, creating false drop shadows, etc. The 555 Kubik facade is a clear example of this technique. Illusionistic mapping is incredibly popular, but doesn't translate to real life as well as it translates to the single perspective of web-based video.
- Augmentation-based mapping, which has been around since at least 2006/2007 with Pablo Valbuena's "Augmented Sculpture" series. This technique does not create false geometry, just false lighting effects. Shadows and reflections are generated only as if the surface was responding to virtual light sources. Colors are used to "paint" the surface rather than for the sort of trompe-l'œil of the illusionistic approach.
One of the earliest examples of projection mapping is more illustionistic, without being as cliche as most projection mapping today: Michael Naimark's "Displacements" from the early 80s was based on shooting video in a room with actors, painting the entire room white, then reprojecting the footage.
There are a number of tools available for projection mapping. Here are a few:
- vvvv is Windows-only but used by visualists around the world for creating massively multi-projection live visuals using a patch-based development interface. The strength of vvvv for projection mapping lies in its preference for 3d visuals, and in real time feedback while prototyping.
- madmapper is not meant for generating content, but for mapping pre-rendered content or streaming real time content via Syphon. madmapper provides an interface for selecting masks, duplicating video sources across surfaces and projectors, and warping projections to match nonplanar surfaces.
- little projection mapping tool shares a similar spirit to madmapper, but is built with openFrameworks and the source code is available for learning or hacking.
- mapamok uses a different paradigm, oriented towards separating calibration from content creation. mapamok loads a 3d model, and allows realtime editing of a shader to determine the look and feel of the projected visuals. Calibration is handled via a quick alignment process that requires selecting 8-12 corresponding points.
The assignment this week is simply: create and document a compelling projection mapping project. You may work with the tools we discussed in class (123d catch, reconstructme, madmapper, mapamok) or build your own. Try to break out of the paradigm of using a projector for creating a "screen". Instead of projecting onto a 2d surface of a 3d object, try projecting across an entire 3d scene, or covering an entire 3d object. Think about whether you want to make something more "illusion" oriented, or "augmentation" oriented: what aesthetic are you more interested in? Consider the difference between fabricating an object specifically for projection mapping, versus scanning/measuring an object that already exists. Think about what an interactive version of your system would look like.
At the beginning of next week's class everyone will briefly present documentation from their projection mapping project.
Setting up reconstructme
First install "OpenNI-win32*.msi" then "SensorKinect-wind32*.msi" then "ReconstructMe_Installer*" and, finally, get the OpenCL.dll file if you see an error when trying to run reconstructme.
Thursday, October 4, 2012


Wednesday, October 3, 2012
Saturday, September 29, 2012
Week 4
This week we spent a lot of time going over the assignments built with ofxKinect, ofxOpenNI, and ofxFaceShift from last week. There were a few short bypaths into discussions on:
- Microsoft's tracking technique used for the Xbox and MS Kinect SDK ("Real-Time Human Pose Recognition in Parts from Single Depth Images")
- Hand and finger tracking, extending Microsoft's technique directly, or aided by lycra gloves, or using a new super-accurate algorithm from CVRL
- Detecting and generating silly walks, silliness as an unexpected deviation from the mean, and caricatures as exaggeration of deviation
We then discussed a host of examples that live in the Appropriating New Technologies repository related to 3d visualization. These examples demonstrate rendering point clouds, slices, voxels, meshes, with and without lighting, depth of field, and some other filmic techniques.
I also highly recommend checking out James George's RGBDToolkit for some nice realtime wireframe mesh with depth of field rendering.
James' code still needs to be broken out into a separate addon/example, right now it's deeply embedded within the RGBDToolkit application.
This week's assignment is: fabricate a physical 3d model. This means you have to take what was once "measurements" or "coordinates", and construct a physical object based on those values. This might mean folding some paper using papercraft techniques.


Or stringing lots of beads on wires:

Or printing slices of point clouds onto transparent sheets of material:


Or using slices of laser-cut cardboard:

Or even, yes, using a 3d printer such as a MakerBot with a Kinect, or the ZCorp printer at the AMS.
The goal is to become familiar with at least one technique for getting 3d data from the computer screen to the real world. You're encouraged, first, to build your own tools and be creative with the technique that you choose to manifest the 3d data. However, if you're not building your own tools for this assignment, then it should be clear from the quality, aesthetic, and concept behind the final object.
Friday, September 28, 2012
Thursday, September 27, 2012
Monday, September 24, 2012
Week 3
First we followed up on the homework, and talked about some of the pitfalls of basic tracking and how to reconcile them (averaging regions of depth data, using temporal smoothing).
Then we discussed gestures, which is a general way of describing higher level analysis of depth data. We focused on:
- ofxOpenNI including basic initialization, skeleton tracking, and hand tracking
- ofxFaceShift and FaceShiftOSC
We spent the last half hour looking at some work from Toshi, who is a something-in-residence at ITP and former ITP student sitting in on the class. Then we discussed ofxCv which we'll definitely get into more in the future.
The assignment this week is to pick an interesting gesture, track it using a Kinect (with any available library/toolkit: ofxKinect, ofxOpenNI, ofxFaceShift) and cause the gesture to influence something, or have some output, that is not on a screen.
Friday, September 21, 2012
Thursday, September 20, 2012
Sunday, September 16, 2012
Cheating with the 3D Scanning
Three dimensional scanning is a bit of a challenge for anyone really but there are more and more tools to help you figure out how to image a physical object in terms a computer can understand and work with.
 Of course the traditional techniques include understanding depth and location by directly measuring it like LIDAR and UltraSonic sensor, but those all require a great deal of specialized equipment. But then you have techniques that can extrapolate some knowledge from a 2D image and one of the newest techniques is the 123DCatch from Autodesk.
 I used the 123DCatch App on the iPad to try to capture my sculpture for Idea's Taking Shape, a particularly difficult object to capture. The way 123DCatch works is by taking a great number of 2D images of the object from a variety of angles and then feeding the images into a cloud-based processor to stitch the images based in part on the content of the images and based also in part on the gyroscopic sensor data from the iPad, and then extrapolating the object's 3D figure.
The ultimate result was a disappointment, which I believe was due to the shapes complexity as well as the poor quality of the images. Take a look below at the image 123DCatch suggested!


 Of course the traditional techniques include understanding depth and location by directly measuring it like LIDAR and UltraSonic sensor, but those all require a great deal of specialized equipment. But then you have techniques that can extrapolate some knowledge from a 2D image and one of the newest techniques is the 123DCatch from Autodesk.
The ultimate result was a disappointment, which I believe was due to the shapes complexity as well as the poor quality of the images. Take a look below at the image 123DCatch suggested!


Friday, September 14, 2012
Week 2
Today we got started with openFrameworks and ofxKinect. All the code is available on GitHub on the 3dsav repository. We covered:
- Interfacing with ofxKinect
- Exporting depth and color data from the Kinect
- Rendering point clouds efficiently with openFrameworks
- Building meshes from point clouds
- Depth thresholding and background subtraction
This week's assignment is to build a forepoint detection and drawing system. That means detecting the point closest to the kinect, and using it to control a line drawing.
If that seems too easy, you should (in increasing order of complexity):
- Render the drawing in 3d instead of 2d.
- Track an arbitrary number of forepoint-like features.
- Implement an algorithm similar to optical flow with tracking, but in 3d.
Pin Screen Point Cloud
Pin Screen Point Cloud - Sheiva Rezvani & Claire Mitchell
Our approach was to recreate the structure of a pin screen, coat the screen in "ink" and create an impression into layers of mesh. We hypothesized that we would get a 3dimensional impression that resembled a digital point cloud. We could then take images of each individual screen, and digitally reconstruct the object from the layers.
We began by experimenting with materials, different sizes of mesh, various levels of elasticity, different sized pins, nails in order to get the right combination of 1) long enough to create a significant depth 2) sizes that would be complimentary so that the pins could easily go through the layers of mesh 3) structural frame for both pins and mesh.


Nail Screen Construction

Nail Screen Construction

We first tried to scan a mannequin's eye

Mannequin Eye Scanned

But the nails wouldn't go through the mesh.

So we used a banana and smaller pins

Banana Scan


We took an image of each layer of the glowing print to rebuild the 3d point cloud digitally- capturing the glowing ink became a challenge but the next step would be to rebuild the layers digitally.

OCD Cook's Chicken Drumstick Scanner
By Hye Young Yoon and Jee Won Kim
OCD Cook 3d Scanner Project from Jee Won Kim on Vimeo.
OCD cook has a mission with his or her chicken drumstick.

1.Install distance Measuring laser pointer inside the rotating wooden plate, inside the top hole
2. Rotate the laser around the drumstick and lower the laser as you rotate.
3. Jot down your 3d measurement from drumstick.
4. Calculate how much time is needed in order to cook the perfect drumstick!!!!
OCD Cook 3d Scanner Project from Jee Won Kim on Vimeo.
OCD cook has a mission with his or her chicken drumstick.
1.Install distance Measuring laser pointer inside the rotating wooden plate, inside the top hole
2. Rotate the laser around the drumstick and lower the laser as you rotate.
3. Jot down your 3d measurement from drumstick.
4. Calculate how much time is needed in order to cook the perfect drumstick!!!!
Subscribe to:
Posts (Atom)